Installation
Washing Machine Installation: A Simple Guide
Washing machine installation is an important step that affects how well the appliance performs from the very beginning. A correct setup helps prevent leaks, vibration, drainage problems, and electrical issues. Whether you are installing a new machine or replacing an old one, taking time to prepare the space and connect everything properly will save you from expensive repairs later.
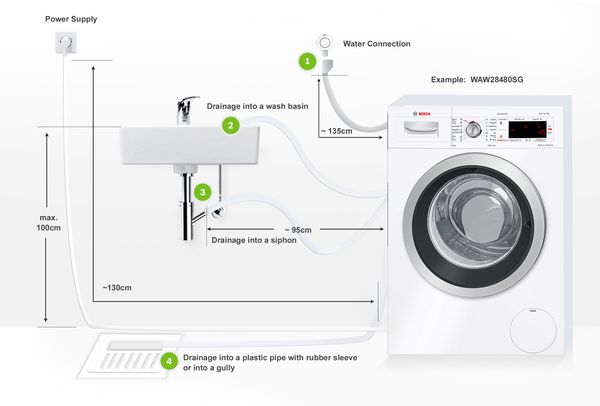
Before starting, make sure the washing machine fits the available space and that there is access to a water supply, a drain point, and a power outlet. It is also helpful to have a few basic tools nearby, such as an adjustable wrench, pliers, and a level. If you are replacing an old machine, turn off the water supply, unplug the unit, and remove it carefully from the area.
The first step in installation is to unpack the machine and inspect it for any visible damage. Remove all packaging materials, and check inside the drum for accessories or documents. Most new washing machines come with transport bolts or shipping braces that keep the drum stable during delivery. These bolts must be removed before the machine is used because leaving them in place can cause excessive noise and vibration during operation.
Next, position the machine close to its final location. It is best not to push it tightly against the wall yet, because you still need room to connect the hoses and inspect the fittings. Place the washer on a flat, strong surface that can support its weight. If the floor is uneven, the machine may rock or shake during spinning, which can reduce performance and damage the appliance over time.
After positioning the machine, connect the water inlet hoses. Most washers have separate connections for hot and cold water, while some models use only a cold-water inlet. Make sure each hose is attached to the correct tap and inlet. Tighten the fittings carefully, but do not overtighten them, as this can damage the seals or threads. It is also important to ensure that any rubber washers are in place to prevent leaks.
The drain hose should then be connected to the proper drainage point. This may be a standpipe, sink outlet, or another approved drain location depending on the model. The hose should be secured properly and should not be bent, twisted, or forced too far into the drain opening. A poorly installed drain hose can lead to slow draining, backflow, or water spillage.
Once the hoses are in place, level the washing machine by adjusting its feet. Use a level tool to check that the appliance sits evenly from side to side and front to back. If the machine is not level, it may move around during spin cycles and produce a lot of noise. After adjustment, make sure the feet are locked in position if the model includes locking nuts.
The final step is to connect the power supply and test the machine. Plug it into a suitable grounded outlet, then turn on the water supply slowly and check for leaks around all hose connections. Run a short cycle without clothes to confirm that the washer fills, drains, and spins correctly. This test helps you spot any issues before you start using the machine regularly.
Proper washing machine installation improves safety, efficiency, and durability. It reduces the chances of damage and helps the appliance perform at its best. If you are unsure about the plumbing, drainage, or electrical setup, it is better to hire a qualified technician. A careful installation today can prevent many problems in the future